Sodium Replacement Drink AKA Electrolyte Drink

In an earlier lesson, I discussed sodium deficiency and “water intoxication.” Although we all need to drink, especially when exercising hard or sweating heavily while working in hot climates, it is harmful to drink too much water. Not usually, so don’t worry – but in that earlier lesson I did cover the cases of three people who drank so much plain water that they were in danger because it messed with their salt balance.

Athletes and people who suffer water loss through diarrhea need to replace their fluids quickly, but also need to restore chemicals. Electrolyte drinks contain sodium, magnesium and other minerals lost through sweat and disease. You can buy commercial electroyte drinks such as Gatorade; but they are expensive, not always available, have too much plastic packaging which is often tossed, and are over-sweetened.

I like this recipe for homemade electrolyte powder which you add to 16 oz water or juice. I took it from the website: https://theplantedrunner.com/homemade-hydration-diy-nuun-electrolyte-powder/

Here it is:

Ingredients

  • 1/4 teaspoon baking soda (307mg sodium)
  • 1/16 teaspoon Morton’s Lite Salt (87.5mg potassium and 72.5mg sodium)
  • 1/16 teaspoon epsom salt (30mg magnesium)
  • optional flavor such as juice, tea, stevia, or water enhancer

Instructions

  1. Measure directly into 16 ounces of cold still or sparkling water or other beverage.

Notes

372.5 mg sodium 87.5 mg potassium 30 mg magnesium

Epsom Salts can be found in most pharmacies and some grocery stores. It might be in the health section because some people add it to bath water for soothing properties. But it’s OK to ingest it orally. Tastes weird by itself.

For diarrhea, use a hydration recipe with sugar. The World Health Organization recommends this simple recipe:

1 quart water, 3/4 teaspoons table salt, 2 tablespoons sugar to dissolve

Capture Wild Yeast

In a previous lesson, you learned that yeast needs warm water and food to awaken and grow. In that experiment, we used dehydrated dormant yeast from the grocery store. Before grocery yeast was available, bakers used wild yeast. Remember that yeast is widely dispersed throughout our environment. Some yeast is good for baking; some isn’t.

How do you capture your own wild yeast? Here’s one simple way.

Activity: Buy organic grapes. Or pick wild grapes (even more fun!). Crush the grapes with the back of a spoon. Place in a plastic container in a sunny spot and cover with plastic wrap. After a a day, or even a couple of hours if the conditions are right, it should start to foam. That means yeast is actively growing and exhaling carbon dioxide gas.

Questions:

  1. Where is the water in this experiment? Remember yeast needs water to grow.
  2. Why do you need to put the plastic container in a sunny place?
  3. What is the food provided in your experiment?
  4. Why do you use organic grapes?
  5. Where did the yeast come from? (the grape skins)

Osmosis and Sodium (salt)

Two friends of mine were rushed to the hospital after suffering mental confusion and a general feeling of being “shut down.” One of them said she was certain she was on the verge of death. The other said she was so weak, she couldn’t function. Both women were diagnosed with sodium deficiency.

What is sodium deficiency?

There is not enough sodium in your bloodstream. Sodium comes mainly from salt (sodium chloride) but can come from other sources, too. (Baking soda contains sodium in the form of sodium hydrogen carbonate.) Every cell in your body contains sodium. There must be a correct balance between the sodium in your bloodstream and in your cells. Your body naturally corrects the balance in most situations. But if the sodium levels in your bloodstream are very low, compared to that in your cells, your cells will swell.

A common cause of sodium deficiency in humans

…is from drinking too much water. It would be very unlikely that eating less salt would cause a sodium deficiency. Instead, drinking too much water lowers the percentage of salt in your blood. Athletes such as runners need to drink lots of water to replace that lost by sweating. But they don’t drink plain water; they drink liquids such as Gatorade that contain sodium and other minerals. Thus, they are getting water without diluting the salts in their bloodstream.

Death from drinking too much water! The following news article, from the Associated Press, details how a woman died from “water intoxication” after taking part in a contest to see who could drink the most water without urinating. Note that one of her symptoms was a massive headache (brain cells swelling)

Jan. 13, 2007, 7:10 PM PST / Source: The Associated Press

A woman who competed in a radio station’s contest to see how much water she could drink without going to the bathroom died of water intoxication, the coroner’s office said Saturday.

Jennifer Strange, 28, was found dead Friday in her suburban Rancho Cordova home hours after taking part in the “Hold Your Wee for a Wii” contest in which KDND 107.9 promised a Nintendo Wii video game system for the winner.

“She said to one of our supervisors that she was on her way home and her head was hurting her real bad,” said Laura Rios, one of Strange’s co-workers at Radiological Associates of Sacramento. “She was crying and that was the last that anyone had heard from her.”

It was not immediately know how much water Strange consumed.

A preliminary investigation found evidence “consistent with a water intoxication death,” said assistant Coroner Ed Smith.

Water follows sodium, is a basic rule. If there is too little sodium in your blood, there will be more inside your cells. Water will flow into the cells (water following sodium) and they will swell. If this happens in the brain, cognitive problems may occur. If heart cells swell, your heart might stop.

Water can pass through your cell membranes through osmosis. That is, liquids passing through a semipermeable membrane to equalize concentrations.

Activity 1: Observe how cells swell with a sodium imbalance

  1. Put a raw egg in a glass of vinegar to cover, and allow to stand overnight or until the shell has dissolved. Gently rub off any remaining shell. The cell membrane will remain, which is porous and allows osmosis to occur. Observe the size of the egg either visually, or by weighing it. You might want to photograph the egg next to another object for comparison
  2. Put the membranous egg into a glass of tap or distilled water, to cover. Allow to sit overnight or longer. Then compare the size of the egg to the original egg. It will have swollen to a larger size.
  3. Why is the egg larger? There was more sodium inside the egg membrane than in the surrounding water. Water follows salt, so water moved into the egg.

Activity 2: Observe water following sodiumreversal of above experiment

Peel and slice a potato. Try to keep the slices equal in width. Fill two glasses with water. In one glass, add 2 – 3 tablespoons of salt and stir to dissolve. Put one slice in regular water, and the other in salt water. The potato slices contain water and represent your cells. The fresh and salt water represents your bloodstream.

Observe after several hours, and again after 24 hours. What has happened to the slices? Can you explain?

Expected results and explanation:

The slice in the salty water should be flexible and may appear shriveled. The slice in the regular water should be firm. The water in the potato followed the salt…and flowed out of the potato into the salt water. Those potato slices then became floppy. The slices in the plain water remain stiff. They don’t lose water to the container, and may even have absorbed a little.

Why is it so dangerous for your cells to swell?

In your brain, that can cause mental disfunction. One of my friends suffered memory loss and anger outbursts. Doctors related both of these to her sodium deficiency.

In your heart, the electric pulses that cause your heart to beat can be disrupted. Swollen heart cells are not able to carry electricity efficiently.

Cells throughout your body are affected, causing liver and kidney problems as well as a host of other life-threatening issues, if your sodium isn’t brought into balance.

How does sodium deficiency occur?

In most situations, your body will take care of balancing your salt, in a process called homeostasis. Doctors believe one of my friends was drinking far too much water throughout the day (10 – 12 glasses); doctors were unable to find the cause in my other friend but were able to correct her condition with electrolyte fluids and observation.

Awaken Yeast

Swipe your hand through the air. Now look at it. Chances are you have brushed against thousands of yeast particles in that brief sweep because yeast, a living organism, exists on most surfaces and in the air all around us. It covers your skin. It is usually dormant…you can think of it as a sort of deep sleep or hibernation. While dormant, yeast doesn’t actively grow. It’s waiting and it can wait a long time. Scientists have found yeast in Egyptian ovens dating over 3000 years old. They woke up the yeast and used it to produce loaves of bread.

How do you wake up yeast? Warm water and sugars is the quick answer.

Why would you care about yeast? Here, we’re talking about culinary yeast. Yeast makes bread fluffy, and some drinks fizzy. That’s because, when yeast is growing, it exhales air and makes bubbles.

In fact, all living things respire to create and release energy. Alternatively, if an organism breathes, it is alive.

Your Breathing:

Activity 1: Take a big breath and then exhale. Do this a number of times, thinking about why we must breathe. This is one of the big differences between living and nonliving objects. If it breathes, it is alive. Rocks, for instance, do not breathe. Breathing involves two basic steps: taking air into our bodies and letting the air pass out.

Activity 2: Put a straw into a glass of water and blow into it. Watch bubbles form. Try blowing soft and slow; then fast and hard. How do the bubbles change? When you blow into the straw, you are exhaling. This simple activity makes our breathing more visible.

Observing yeast respiration (yeast breath!)

Activity 3: Sprinkle a teaspoon of baking yeast over a bowl of lukewarm water. Wait thirty seconds to see what happens. How did the yeast change?

Activity 4: Add 1 tablespoon brown sugar to the bowl and stir gently to dissolve the brown sugar. Now watch what happens to the yeast.

Activity 5: Start with a new bowl, this time with ice water. Sprinkle yeast over the top and observe.

Activity 6: Starting with another bowl, sprinkle yeast over boiling hot water and observe.

What happened:

Warm water activates dormant yeast, which will start to grow. Bubbles and even movement might be observed in the yeast. However, like other living organisms, yeast needs energy to grow and water doesn’t provide energy. Brown sugar is an excellent source of energy. The yeast will start to foam and bubble. How is this similar to breathing activity #2? Observe closely and you can see yeast moving throughout the liquid, and sometimes you can even feel the air being exhaled by the yeast (if you get close enough). Yeast breathes oxygen and exhales carbon dioxide just as we do.

Yeast sprinkled over the ice water will take a long time to activate, even with brown sugar added. Yeast sprinkled over boiling hot water will die. Yeast needs just the right temperature (warm to your hand) to grow. That’s why some bakers have trouble making yeast bread: they don’t get the temperature just right.

Why do bakers use yeast?

The bubbles make bread dough rise. Baked bread is fluffier. Yeast is also used to make some fizzy drinks.

How is commercial yeast made?

Yeast buds are grown in factories, just as you did in activities 3 and 4, except they are grown in large vats and molasses is used for energy. Brown sugar contains molasses, too. Then the growing yeast is scraped off the top of the vats and gently dried. Without water, the yeast stops growing and goes dormant. It is put into pouches or jars for storage. Refrigerating the yeast at home helps keep it viable for much longer.

There are many types of yeast

Some yeast is used for baking, others for nutrition, for making beer or champagne. Another type of yeast that grows on human bodies can cause problems, but mainly when the yeast comes in contact with warm moist regions that are covered by clothing.

Fun for teachers:

Use a clear, narrow glass to grow the yeast. Spread paper towels below the glass. Fill the cup 3/4 full of warm water; then add 1/2 tsp yeast and 1 tsp brown sugar and stir. The point here is to make the yeast grow and foam over the top of the glass, but don’t tell your students in advance. Students will watch the yeast slowly grow…then faster and faster until a huge foam head forms and spills over the side. You should experiment with the proportions and glass beforehand so you get the right effect. Glorious, especially if the teacher acts as surprised as the students.

Jamaica – the other kind – and a healthy heart

Jamaica Drink

Flowers can be good for more than beauty. I learned about this one while living in a farm valley in Northern California. Summers were very hot, shimmering heat trapped between the surrounding mountains. Farm laborers worked the vegetable fields, hoeing and weeding, then harvesting the crops. They wore long sleeves and covered their heads with hats, fabric falling down from the brims to cover their necks. This was to keep from sunburn. Alongside, narrow roofed wagons provided resting stations with benches. There was also a large thermos for a refreshing drink. More often than not, the thermos was full of a bright red drink, Jamaica (pronounced hahMYca).

The farm workers were often from Mexico and they were often interested in picking up paid work on the side, after their duties in the field were finished. I was introduced to Pablo and Jesus in this way. These gentlemen trimmed the trees in my walnut orchard and mowed my grass. They became friends. And they showed me how to make Jamaica, a refreshing and healthy drink that quenches thirst and lowers blood pressure. I began drinking it regularly and served it to them when they came to my house. It was a godsend in the heat, but healthy anytime.

Jamaica is a species of hibiscus that grows in the hot arid climate of Mexico. The red flowers are steeped in hot water, just like any other tea. The water turns a beautiful red and has a slightly tart, refreshing taste. You can buy jamaica in most Mexican groceries and in some health food stores. In Mexican groceries, it is often seen loose-leaf (although it is really a flower) in huge bins, sold by the pound.

As found in markets: dry Jamaica blossoms

Recipe for Jamaica Tea

One handful of dried Jamaica blossoms, tossed into…

one-half gallon very hot water

Let steep for thirty minutes.

Notes on recipe: Where I lived, it was so hot that I usually made sun tea by adding a handful of blossoms to a large glass jar of water. I’d let it sit in the hot sun most of the day. Then I’d cool it. I prefer to drink jamaica cold, because I think it’s more refreshing, but hot tea is fine. Sugar or not? Some people add sugar to their jamaica tea. I preferred the natural tart taste; and it’s more healthy that way.

Health benefits: Jamaica tops some lists of foods that lower blood pressure. My doctor gave me such a list when she discovered my blood pressure was slightly elevated, and jamaica was listed number one. High blood pressure causes all sorts of problems including heart attack and stroke. Lowering it through frequent drinking of jamaica was very pleasant. Jamaica is also high in vitamin C and anti-oxidants. Drinking the tea also keeps you hydrated, which benefits all body systems.

Cultural Notes:

Jamaica is a favorite drink in many countries. I saw it for sale by Afghan street vendors, as well as on the streets of Cairo, Egypt. West and east African countries, Caribbean countries, Asia countries…it is a part of all their cultures although it goes by different names. If you want to try one tradition, here are two recipes I’ve adapted from traditional Christmas foods served in the country of Jamaica: hibiscus tea and sweet potato wedges.

Sorrel Drink (dried hibiscus blossoms are known as Sorrel in the country of Jamaica):

Prepare tea as for Jamaica (above), but add 2 TBSP ginger before steeping. Another version calls for mixing the steeped tea with purple grape juice. Yummy and doubly healthy.

Sweet Potato Wedges

Wash and slice sweet potatoes into wedges. In a large bowl, toss the wedges with just enough olive oil to lightly coat. Add a sprinkling of salt and pepper and 1 tsp paprika. Spread wedges on a nonstick tray and bake in the oven at 350 degrees for 30 minutes or until tender when pierced with a fork.

Popcorn and Steam Power

Students in Afghanistan learn about popcorn

Introduction:

I like to start this lesson with an electric skillet, an extension cord, and an old sheet spread on the floor. Put the electric skillet atop the sheet and turn it on high. Children can sit around the sheet (not on it) and observe the action. The sheet keeps the floor clean and provides a safety boundary.

Observe what happens to water when it gets hot. Once the skillet is hot, use an eye dropper or straw to add a drop of water to its surface. It’s more dramatic to add the drop from a height above the skillet. Students usually delight in the sound of the hissing water and the sight of the water sizzling and disappearing. What happened to the water? Where did it go? Students often want to see this repeated several times. You might want to add a larger amount of water on subsequent demonstrations so they can watch it for a longer time.

Explain to students that heat causes the water to expand to the point where it bursts and turns into steam. I like to draw a slo-mo cartoon of this on the board: a spherical drop of water hitting the hot surface, growing larger…and larger…and bursting like a firecracker. Energy is released when the drop turns into steam.

The energy released with a single drop of water isn’t much, but the energy released with large amounts of water can be quite large. This energy has been used to power large machines. Show children pictures of steam trains, large ocean-going ships, boilers on tug ships. Find the heat source and the boilers on these pictures.

Popcorn. Give each child a kernel of unpopped popcorn. Ask them to describe its shape, size, texture, smell, even the sound it makes when dropped onto a hard surface. Some children may have only popped corn in a pouch and never seen what unpopped kernels look like. Have they ever popped corn at home? How did they do it? (they heated it in various ways). What causes popcorn to pop? Why doesn’t corn on the cob pop? There’s something different about popping corn, but it’s clear that heat is involved.

Demonstration: add a small amount of corn oil to the hot electric skillet. The oil helps spread the heat around the kernels. Then add one or two popcorn kernels. Keep the number of kernels small to allow the students to concentrate. Observe the kernels closely. They may begin to jiggle; then pop. Ask the students again why they think the popcorn popped. After waiting for answers, you might suggest there is something inside the kernels that explodes when it gets hot. Return to the previous demonstration about steam. Inside each kernel is a small amount of water. When it gets hot, it turns to steam with an explosion, causing the kernel to pop inside out. Another factor is the tough skin on the outside of the kernel, which holds the water in place until it is heated sufficiently to explode the kernel.

Enjoy: Add more oil if necessary, then add enough popcorn to serve the entire class. Leave the lid off the electric skillet for maximum fun. Stir the popcorn as it heats, to keep it from burning. Instruct the students to keep off the sheet, and to not pick up any popped corn. It will be hot! The teacher or parent can collect all the popped corn from the sheet when the skillet is empty. As the corn pops, think of the power released. Watch the height and distance the corn travels when it leaves the skillet. After the corn has popped, compare it to the unpopped corn the students had at the beginning. How has it changed?

Connections to other cultures and history:

Corn cobs with remnants of popped kernels have been discovered in the mountains of Peru, dating from approximately 6000 years ago. That corn was probably discovered accidentally when roasting cobs directly over the fire. Ancient Peruvians may have begun selecting and saving kernels of this type of corn for later planting. Ancestors of today’s Pueblo Indians knew how to pop corn. Popped corn dated from 1000 years ago was found in a cave in Utah where they lived. By some accounts, it was popcorn that native Americans offered to European pilgrims upon their arrival in the Americas.

Ancient Popped Corn cob found in Peru

Street vendors in Afghanistan and India use an unusual method of heating their popcorn: roasting it in skillets of sand set over a fire. I encountered this method while traveling in Afghanistan and at first could not believe what I saw. But my friends insisted it was true, allowing me to touch the cooled sand in the skillet – to the amusement of the street vendor. The popped kernels rise to the top of the sand and are cleansed of it by shaking the kernels through a strainer. In fact, further research on my part has led to my discovery that Iroquois Indians heated their popcorn in this way. French Canadian explorers were served the popcorn fresh, and in popcorn soups.

Street vendor cooks popcorn in sand

Make a Sundial Part II

Materials needed: face plate (made in Sundial part I), protractor, glue, BBQ skewer, cardboard scrap, cardboard rectangle large enough to hold sundial/BBQ skewer arrangement

Now that you have made the face of the sundial, you need to set it. That requires two pieces of knowledge about where you live. In this brief lesson, we will discuss your latitude.

You can find your latitude by googling “latitude your town“, or you can check a map. The face plate of your sundial must be angled to that same angle. There are a number of interesting ways to make this happen depending on your sundial design. For instance, I have made jiffy sundials from folded postcards of the place I’m visiting. Here is one easy way to use your latitude angle:

  1. Make a hole in the very center of your sundial face with a thumbtack.
  2. Insert a BBQ skewer, having a tight friction fit. The skewer will be your gnomon. The gnomon casts the shadow. “Gnomon” is Greek meaning one who knows.
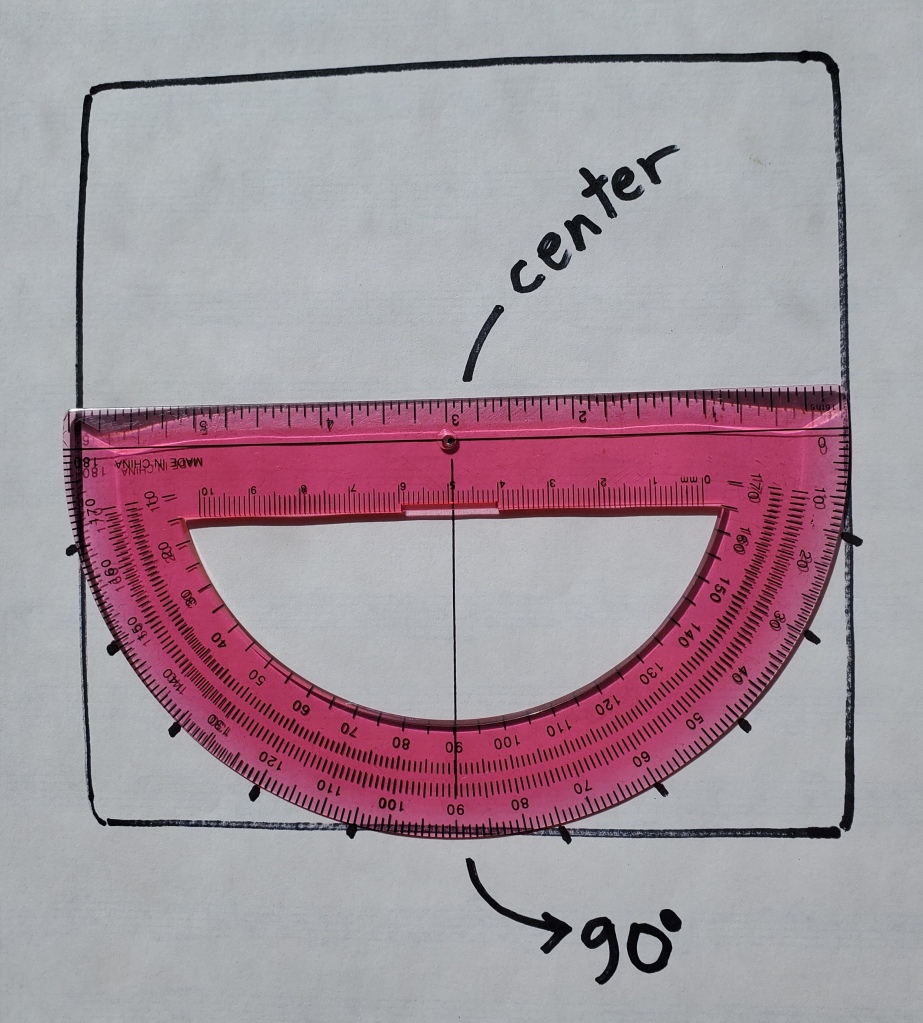
  3. Prop the other end of the BBQ skewer against a triangle which you cut from cardboard. The triangle will be a right triangle (one angle is 90 degrees) with your latitude angle positioned as shown in the drawing below. Make sure you have the triangle positioned correctly. Apply a strip of glue to the triangle and glue it to the skewer. Optional: Leave a small extending point below the triangle. You can use this small point to stick the skewer into a slab of cardboard as a base for your sundial and move it around more easily.
  4. For example, my latitude in San Francisco is 38 degrees. See the drawing to look at the correct angle position.
  5. The friction fit of the skewer in the face plate will hold the face plate at the correct angle. The friction fit will also hold the skewer at a 90 degree angle to the face place – which is necessary for correct shadow casting. You can double-check that 90 degree angle by putting a square piece of cardboard under the gnomon.
Setting the latitude angle

There is one more step: finding true north. That will be addressed in the next lesson. Apologies for the simple sketch; I will replace it later with a photo.

Make a Working Sundial Part 1

The shadows sweeping across a sundial’s face tells far more than the time. It marks our latitude and longitude, tells us our position in relation to Polaris the North Star, whether the sun has passed through an equinox, and whether the sun is near its zenith in mid-summer or has dropped to its lowest arc in the heart of winter.

Most of us can delight in the knowledge that we have lassoed the sun for a clock when we make a sundial. Even children in kindergarten laugh to see how a shadow marks the hour for recess or a snack. But the study of sundials can pull you deeper and deeper into joyous realms of knowledge: astronomy, geometry, seasons and equinoxes, magnetishm and the north pole, art and poetry, latitude and longitude, time telling around the world, carpentry.

Shadow and sun clocks have been in use over many parts of the world thousands of years. Ancient examples in Babylonia and Egypt were mere sticks in the ground. These sticks evolved into great obelisks, sun temples, sundials, navigational tools, implements used in solstice rituals, and timepieces for the common citizen. Sundials graced buildings, gardens, wrists, necks, fingers and even gravestones. Until the 1700’s, sundials were relied upon for accurate time, and helped navigators find their way across endless oceans.

You can make a sundial that tells accurate time. It will give you correct solar time, without the fudge factors built into modern watches or cellphones to make our lives more standardized. The directions included in this series of sundial lessons will teach you how to correlate true sun time with modern devices. But it is always the sundial that is correct; your cellphone or computer that is off!

The subject matter is simply too great for one lesson, so I have divided it into several. But you’ll want to get started now, because this equatorial sundial does something special on the equinoxes and one is just around the corner on March 21.

Materials

Protractor, 4″ (approx) square card stock or cardboard, pushpin, crayons or colored pencils (optional but nice), pencil, pen

Make the Sundial faces. I have put all the photos below, to make reading faster.

  1. Use a pencil to lightly draw two diagonal lines across the card stock to locate the middle. Mark that point neatly but darkly because it will be your beginning point. The diagonal lines will not be used further.
  2. Use a push pin to make a hole through the center point.
  3. Drop a noon line from the center point to the “bottom” of your square. This line must be exactly perpendicular to the bottom edge, or your sundial will not work. Remember, a perpendicular line will have a 90 degree angle. Use a protractor for this step.
  4. Use a protractor to measure 15 degree angles on either side of the noon line. These are the hours lines (photo will help). Mark 9 angles/hour lines on each side of noon, but do not label them yet. Do the same thing on the other side. The noon line must drop to the same edge on both sides. Read these notes first:
    1. Note 1: Why 15 degrees? If the sun travels 360 degrees during a 24-hour day, you divide 360 by 24 to find that the sun travels 15 degrees each hour.
    2. Note 2: Draw as many hour lines as daylight would permit on each side. For instance, you’ll probably need 6 hour lines on each side of the noon line during the winter, (6 a.m. to 6 p.m.) but you will need more during the summer.
    3. Note 3: There are two sides to this protractor because one side is read during summer and the other side read during winter. More on this later; just draw the hour angles now.
    4. I have shown how to use two types of protactor to draw these lines. Since many students have difficulty using the standard protractor, my husband and I patented another type of protractor and that one is deep red. You can obtain one of these protractors by contacting me, but the standard protractor can be used.
  5. Label one face “Summer” and the other “Winter”. The photos will provide other labels you need to add. The labels may seem to be reversed but do as shown.
  6. Now label your hours as shown below on each face. Again, the hours may appear to be reversed but they won’t be once you orient your sundial in a later step of the lesson.
1. Mark center point
2. Draw Noon Line with Barry Protractor
2. Alternate: Draw noon line with standard protractor
Noon line completed
Hour lines: Mark first hour line with Barry Protractor. One edge of the protractor is aligned with noon line.
Add more hour lines by swiveling Barry Protractor. Keep one edge of protractor lined up with noon line as you do so.
Continue swiveling protractor to add more hour lines
Move Barry protractor to the other side of noon line and add more hours as before. Remember to keep one edge of protractor aligned with noon line.
15 degree hour lines on either side of noon line. Not all hour lines are drawn.
Alternate: Using standard protractor, mark 15 degree hour lines on either side of noon line and connect. You may need to move protractor to add all the hour lines you need.
Label one side as above. Decorate if desired.
Flip the card to the back side and label as shown above. Remember to drop the noon line to the same edge on both side.

Get Off the Earth!

I absolutely love this geometric puzzle, which I first discovered when reading a book by Martin Gardner. Martin Gardner, in turn, had been introduced to me by my husband David. Martin Gardner was a long-time contributor to Scientific American; he wrote about mathematic and scientific curiosities. Such things were fun for my husband, and myself. I hope you’ll enjoy this puzzle as much as we did!

Sam Loyd Puzzle Get Off the Earth

Sam Loyd was a chess player and puzzle creator at the turn of the 20th century. Some of his puzzles, such as Get Off the Earth, were sold as novelty items. Count the number of Chinamen on the puzzle above. You’ll see the arrow is pointed to “NE” on the globe. Then rotate the arrow to “NW” and one of the Chinamen has disappeared. Where did he go?

You can recreate this puzzle by printing and cutting out the two pictures below and assembling them with a brad.

This is a type of vanishing puzzle. Parts of the 13 original Chinamen have been cunningly redistributed so that there are only 12 when you rotate the circle. It helps understand this if you take some playdough and create 13 worms. Then distribute parts of the 13th worm over the remaining 12 worms.

Here are some other examples vanishing puzzles using the same principle.

10 eggs here…
How many eggs now?
and how many eggs now?

One practical application of a vanishing puzzle might occur to you when the airport clerk says you have too many pieces of luggage. “You’ll have to pay an additional $200 for that 5th piece of luggage…unless you can divide its contents among the other 4.”

Science yields clues to an ancient salt mine

Two Experiments Help Solve a Mystery

“Residents mined and traded salt” The sign offered little information, but I wanted to know more. Ruins of an ancient Anasazi settlement were huddled into a cliff above a sinkhole full of green water and leeches. “Where did they mine salt?” I asked a ranger. He directed me to nearby Camp Verde. “Look for Salt Mine Road and just keep driving. You’ll see white mounds.” So I was off.

Cliff Dwellings Montezuma Well, New Mexico

These mounds had been worked in historic times. Lumber and twisted railroad ties lay on the ground. I strode up the mound and scooped up the white powdery material, then tasted it. It wasn’t table salt as I knew it, but did have a taste of salt mixed with … something else. Dirt was liberally mixed with the salt.  Was this material good for health? Was it sodium chloride (table salt) or something else? How was the dirt removed before eating? Or was it removed? 

Mine Workings

Crystal structure of sodium chloride could provide some clues. Common salt crystals are cubic. (Not in your salt shaker, as the crystals have been ground to a powder). As I continued to wander, I discovered a salt seep and water running from it. Where the water dropped over a rocky ledge, salty icicles hung. These were pure mineral so I broke off a few icicles and placed them in an empty coffee cup I was carrying. I would analyze these later. I peered closely at some crystal fragments drying in the sun. They weren’t cubic; the white crystals were slender needles. By the way, exploring can be messy. My feet sank unexpectedly into deep goo near the salt creek, leaving my shoe behind. I dug around for it; then walked back to my car with mud peeling off my legs. I washed off in what happened to be a historic irrigation ditch down the road.

I washed off in the Camp Verde Ditch

Experiment: grow crystals

Here’s how to analyze those crystals and discover what they might be. You can do this experiment with many common substances: salt, epsom salts, sugar. Dissolve clean grains in pure water. Start with 1/2 cup of water and dissolve as much powder as the water will take. If you heat the water first, you will be able to dissolve more powder because hot water dissolves salts more easily. Stir until theThen pour the solution onto a cookie sheet with rims to keep it from running off. If you line the cookie sheet with black construction paper, the crystals will be more visible but that’s optional. Put the cookie sheet near a window where it will get indirect sunlight and wait for the water to evaporate. Crystals will be left behind. I learned the hard way not to put the cookie sheet under direct hot sunlight. Evaporation will proceed so rapidly that good crystals don’t have time to grow. But this could be another experiment! Put one tray in the heat of summer sun and another in bright but indirect light near a window. Compare the two.

Observe the shape of the crystals. If they’re cubic, you have sodium chloride. If it’s needles, you may have magnesium sulfate. (epsom salts).

Magnesium Sulfate Crystals

Experiment: Clean dirty salt

If you don’t have clean crystals, you’ll have to remove the dirt first. How to do this? Dissolve the material, dirt and all, in water and pour it through a filter. I use paper towels or cloth in a colander. Then you can proceed as above. You can also try growing crystals using dirty salt/powder. How are they different from the cleaned substance?

How did the ancient Anasazi clean the salt? They had no paper towels, colanders, and possibly no cloth as we know it. Think about this. Perhaps they let the “salt” water solution sit in a pot until the dirt settled out, then poured off the liquid for evaporation. Did they have flat stones for an evaporative surface? Or did they mix the salty solution into their foods? Or eat the salt with the dirt included?

What were the effects of eating magnesium sulfate? This mineral is actually important for many cellular functions and is sometimes used as a laxative. There are rarely negative side effects from eating it, but using it in place of salt may have left a salt deficiency in Anasazi diets. Sodium chloride is vitally important for survival. If they weren’t getting it from the “salt” mine, what other sources of salt were available? Meat and blood are one source. Some desert plants contain salt.

NOTE: The term Anasazi is outdated, but I use it here because it is still widely understood. Today’s Hopi Indians are descendants of the “Anasazi” so ancestral Hopi is a better description of cliff dwellers at Montezuma’s Well.